The images in your artwork are really important, so this section expains how to optimise them to ensure good reproduction.
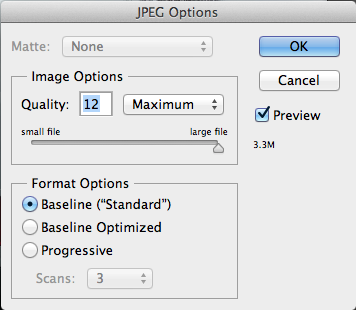
 If you are sourcing photographs yourself, save them as either EPS or TIFF files as this will preserve the colour and clarity of your images - if you use JPG format then ensure that they are saved on the Maximum setting. If you are scanning a previously printed item, such as a magazine photo (obviously with permission from the copyright holder) or an old brochure you will need to ‘de-screen’ the image, blurring it slightly to avoid a moiré effect (see your scanning software manual for more details).
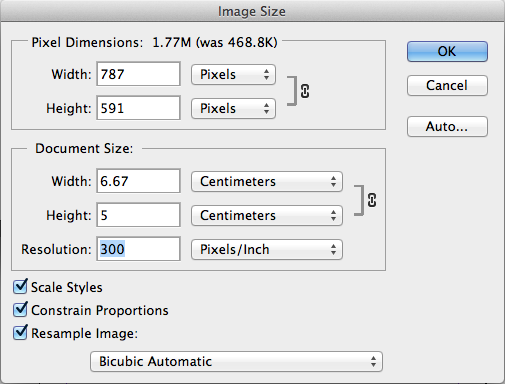
 Consider the final size your image will be used at. Photographs should be 300-350dpi at the size you are going to use them. There’s no point taking a postage stamp at 300dpi and then blowing it up to a A4 size – for scans use your image editing software to help you calculate the output resolution. Conversely, images supplied at more than 300dpi will have no effect on the actual printed quality and will unnecessarily increase file size and processing time.
Don’t enlarge or reduce your bitmap images in your drawing/vector software (such as Illustrator) – it’s always best to use an image-editing application such as Photoshop for this task.
Black and white line art that has been converted to a bitmap (i.e. a logo) should be saved at 1200dpi for best results. Any lower, and the logo may look blurry. Pay careful attention to the CMYK makeup of any ‘black’ in your logo. The automatically-created Photoshop black, for example, is made up of varying percentages of CMYK. You may need to adjust the colour settings in your application to get a sharper black that is made from 100% black ink.
Colour Settings
Colour settings and ink limits are applied when you convert your RGB images to CMYK in Photoshop, e.g. when selecting .
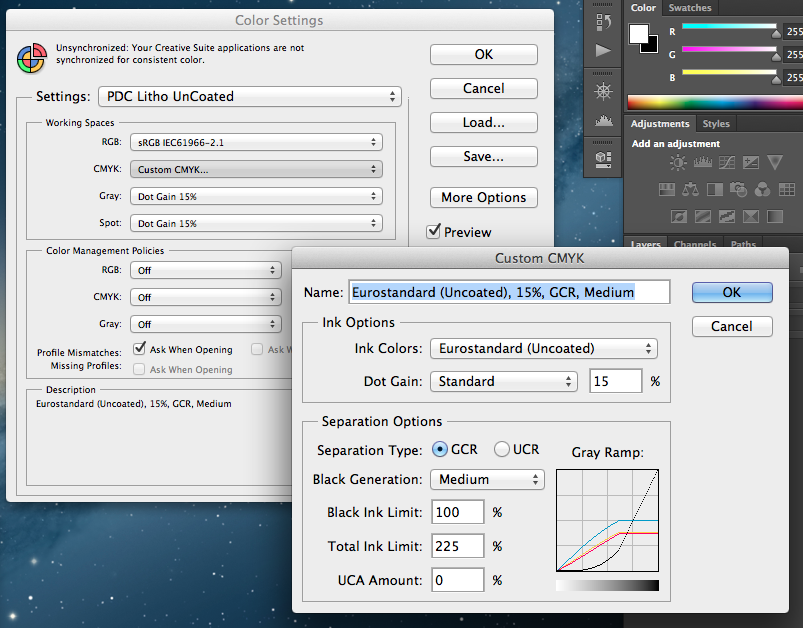
We’d recommend setting up the following colour presets to ensure your images print exactly as expected:
Use the correct colour profiles
Using the wrong colour profiles, e.g. SWOP Coated, can result in your image printing with more magenta.
Using the wrong Dot Gain setting, e.g. 20%, may result in your image printing lighter than expected.
These settings are applied directly to the image; you do not need to embed the colour profile at the 'Save As’ stage.
To create these presets in Photoshop, select and then copy the screenshots below, then saving each preset for future use (e.g. one for Coated, and one for UnCoated).
.png)

You'll need to select the required preset each time you edit a Coated or UnCoated image. These settings are applied when converting RGB images to CMYK, and when adjusting the ink limit of existing CMYK images.
Converting RGB Images (to apply settings)
Select:
Converting CMYK Images (to apply settings)
Select:
You may need to apply a medium or maximum Black Generation setting, depending on the image. For more advice on converting images, please give us a call.
Make sure that any alpha channels are removed and that there is no compression present in your image files. LZW and ASCII encoding should be avoided. Don’t use DCS files, LAB colour, Duo-tones or Tri-tones either – convert them all to CMYK.
Embedded Profiles
 Please don’t embed any colour profiling when saving your files from your image editing software. Embedded colour profiles may accidentally overwrite your colour settings leading to unexpected printing results.


 Print this page
  If you are sourcing photographs yourself, save them as either EPS or TIFF files as this will preserve the colour and clarity of your images - if you use JPG format then ensure that they are saved on the Maximum setting. If you are scanning a previously printed item, such as a magazine photo (obviously with permission from the copyright holder) or an old brochure you will need to ‘de-screen’ the image, blurring it slightly to avoid a moiré effect (see your scanning software manual for more details).
 Consider the final size your image will be used at. Photographs should be 300-350dpi at the size you are going to use them. There’s no point taking a postage stamp at 300dpi and then blowing it up to a A4 size – for scans use your image editing software to help you calculate the output resolution. Conversely, images supplied at more than 300dpi will have no effect on the actual printed quality and will unnecessarily increase file size and processing time.
.png)

 Please don’t embed any colour profiling when saving your files from your image editing software. Embedded colour profiles may accidentally overwrite your colour settings leading to unexpected printing results.